


Cutting out an image means isolating a subject (a product, a person, an object) by removing all the background around it. The result: a visual on a transparent background that you can drop onto another color, a banner, or a product page. For a simple photo, a free tool does the job in a few seconds. For blurry hair, transparent glass, or a fuzzy outline, those same tools start to smear and leave traces.
This guide first shows you how to cut out cleanly, then where the exact line sits: at what point free stops being enough, and which reflex to adopt based on your real usage. You don't need any photo-editing skills to follow along. We'll go method by method, with concrete examples and the cases where each solution breaks down.
What's the simplest way to cut out an image?
The simplest method is to use an AI Lab that handles cutting out, changing the scene, and background edits all in one place, with no software to install. That's the starting point I recommend to a beginner, because you see the before/after result live and adjust without starting from scratch.
In the Skilzy AI Lab, you open the Image tab, the “The background” section, and you get three grouped edits: Cut out (remove the background), Change the scene (replace the background with another one) and Bokeh effect (blur the background to make the subject stand out). Each one comes with a before/after slider so you can compare at a glance.
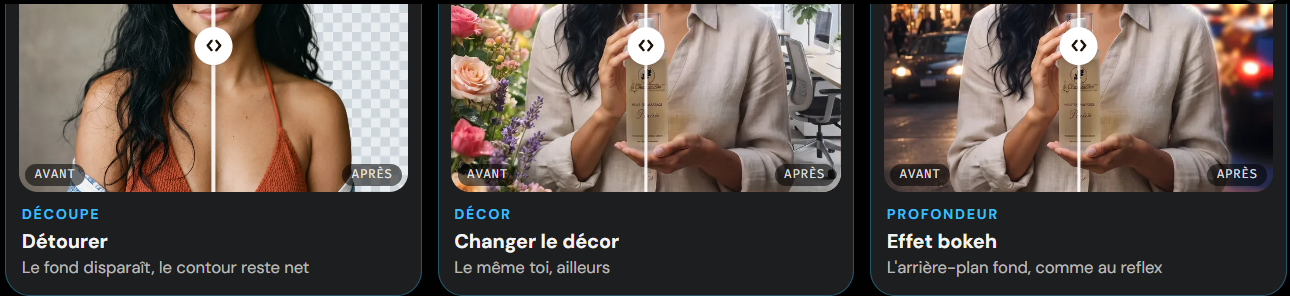
The benefit for a complete beginner: you don't stack three different subscriptions for three needs. Cutting out, changing the scene, and blurring the background are all in the same place, with credits included. If you want to understand more broadly how to produce clean visuals without being a graphic designer, the approach is detailed in our guide on how to create pro visuals without being a designer.
As for getting started, Skilzy brings together more than fifteen programs to learn how to use AI (image, video, music, automation, prompts). To go further, take a look at Skilzy's visual creation programs, which cover cutting out but also image generation and full retouching.
Is your phone's built-in feature enough?
Yes — for a quick, occasional cut-out, your phone's built-in feature is enough and costs nothing. It's even the first thing to try if you just need to isolate a sharp subject to send to someone.
On iPhone (from iOS 16 on), you open a photo, press and hold on the subject until you see a glowing outline, then choose “Copy” or “Share.” The subject is automatically extracted from the background. On many recent Android phones (Google Photos, Samsung galleries), an equivalent feature exists under names like “Cut out” or “Erase background.”
What it does very well:
- An object or a person clearly separated from the background
- A clean outline, with no transparency or fine details
- A one-off need, without switching to a computer
The limits show up fast as soon as the subject gets complicated. The built-in feature doesn't let you retouch the outline by hand, it doesn't handle hair or fur precisely, and it locks you into the app's output format (often with no transparency setting). For repeated pro use, you'll quickly hit the ceiling.
Remove.bg and third-party online tools — who are they for?
Online tools like remove.bg are built for automatic one-click cut-outs, handy for a moderate volume of simple photos. You drop in your image, the algorithm removes the background, and you download a transparent PNG. It's fast, and the baseline quality is decent on sharp subjects.
The pricing model is the classic trap. Most of these services let you try for free, then limit download resolution, the number of images per month, or high definition behind a subscription. So an alternative to remove.bg comes down to three things: quality on tricky outlines, free output resolution, and price once you exceed the quota.
A few pointers for choosing a third-party tool:
- Free resolution: some block HD, so you get back an image too small to print
- Fine outlines: test on a photo with hair before you pay
- Monthly quota: count how many images you actually cut out per month
- Manual retouching: being able to fix the outline by hand changes everything in edge cases
These tools shine on standardized volume (product photos on a light background, sharp portraits). They disappoint as soon as the photo falls outside the ideal frame — and that's exactly where the free question really comes up.
When are free tools enough, and when do they fail?
Free tools are enough as long as the subject is sharp, well lit, and set against a contrasting background; they fail on blurry outlines, hair, transparent materials, and backgrounds close to the subject's color. Knowing this line saves you an hour spent fixing a botched cut-out.
The cases where free does the job perfectly:
- A product set on a white or plain background
- A sharp person, arms at their sides, clear background
- An object with crisp outlines (a chair, a bottle, a phone)
The cases where free shows its limits:
- Hair and fur: fine strands are either cropped off or surrounded by a halo
- Transparent materials: a glass, eyeglasses, or a veil let the background show through, which the tool can't handle
- Low contrast: a dark subject on a dark background, and the algorithm can no longer find the boundary
- Motion blur: a moving subject has a fuzzy outline that the tool cuts through badly
When you run into one of these cases, there are two reflexes: either you retouch the outline by hand in a tool that allows it, or you work around the problem. For example, rather than cutting out a subject with complicated hair, the bokeh effect (background blur) makes the subject stand out without requiring a perfect outline. It's often the best compromise for a profile photo or a thumbnail. Keeping a record of your successful attempts in a simple tracking table, without Excel, helps you reuse what works instead of starting over every time.
How to choose based on your real usage?
The right tool depends on three things: how often you cut out images, how difficult the photos are, and the output quality you need. Here's a quick guide to decide without hesitating.
| Your usage | The right solution |
|---|---|
| A one-off cut-out, sharp subject | Your phone's built-in feature |
| A small volume of simple photos | A free online tool like remove.bg |
| Difficult photos (hair, transparency) | An AI Lab with background edits and before/after |
| Regular cutting out plus scene changes and bokeh | An all-in-one AI Lab with credits included |
| A need to learn to produce complete visuals | A program dedicated to image creation |
The real saving isn't measured by the sticker price but by the time you spend fixing things. A free cut-out that forces you to redo every outline by hand costs you more than a solution that produces a clean result the first time. If you cut out an image once a month, stick with free. If you produce visuals every week, a tool that combines cutting out, scenes, and blur saves you from juggling three subscriptions and saves you hours.
One last point for beginners: cutting out is only one building block. Also knowing how to change a scene, blur a background, or generate a clean image makes you self-sufficient on the whole visual, not just the outline.
Conclusion
Cutting out an image is nothing complicated as long as the photo is sharp and the background is clear: your phone's feature or a free online tool are plenty. The difficulty starts with hair, transparent materials, and backgrounds with no contrast, where free leaves halos and cropped outlines. The right reflex is to know this line, choose the tool based on how often and how difficult your photos are, and test before you pay. Start simple, and step up only when your photos demand it.